 Created in 2007 by the Pennsylvania Office of Child Development and Early Learning (OCDEL), The Pennsylvania Key implements the work and supports the policies developed and managed by OCDEL. Learn More. >
Created in 2007 by the Pennsylvania Office of Child Development and Early Learning (OCDEL), The Pennsylvania Key implements the work and supports the policies developed and managed by OCDEL. Learn More. >
Created in 2007 by the Pennsylvania Office of Child Development and Early Learning (OCDEL), The Pennsylvania Key implements the work and supports the policies developed and managed by OCDEL. Learn More. >This tipsheet provides step-by-step instructions in marking attendance for events by uploading a CSV file on the event roster for one-time, multiple session and self-paced events.
Instructors or organization administrators must update attendee statuses and mark the event as completed within two weeks of the event’s end date. Events automatically close after 60 days.
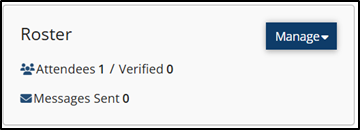
Once all event attendees have been verified and no further changes to the roster are needed, you can select Complete Event in the Event drop-down on the Event Details page to mark your event as complete. This should be done only when all roster changes are complete.
If an event needs to be reopened, email pqas@pakeys.org with the Event ID#, Title, and Date(s). Screenshots of the training event details are also acceptable. Reopened events automatically close at the end of the day.
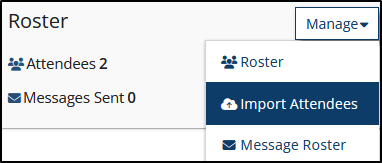
Click the Manage dropdown within the Roster section.
Click Import Attendees.
Import Attendees: One-time and Multiple Session Events
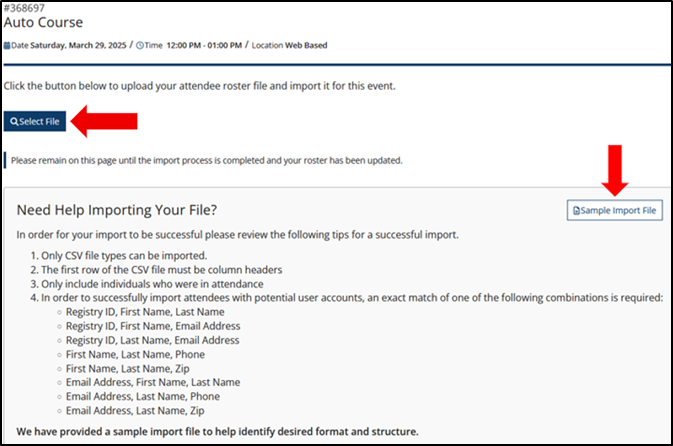
On the import attendees screen, you will find a Sample Import File- you can download that file to fill in for the upload or you can create your own file. The file must be saved as a CSV file for the upload. (Please note that you should only add individuals who attended the training on the file for the upload- the system will automatically mark them as attended when they are uploaded.)
To begin the import, click the Select File.
From the saved files on your computer, choose the correct CSV file.

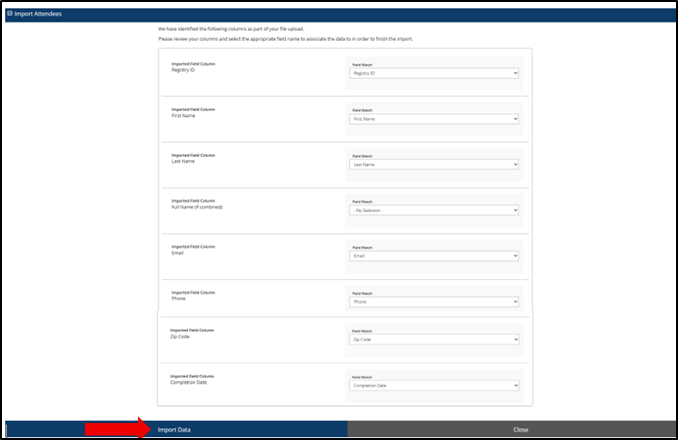
Match the imported field column that is listed on your CSV file to the field match in the system.
You must choose a minimum of 3 fields to continue with the upload. We highly recommend Registry ID, First Name, and Last Name.
After the fields are chosen, click Import Data.
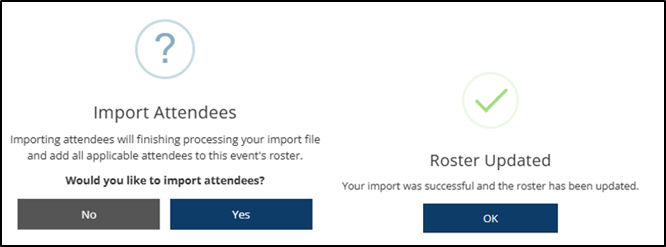
Select Yes to import attendees. Then click OK once the Roster has been updated.
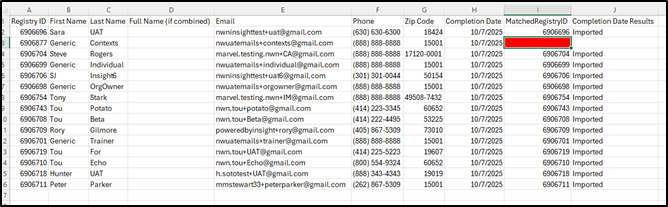
The import results section will show you the number of individuals that were matched and the number of individuals that were not matched.
You can select the Import Results button to download the file that will show you which individuals were matched, and which individuals were not.

On the downloaded file, you will see the Matched Registry ID’s listed on the last column. The unmatched individuals will not have a Registry ID listed.
You can double check and update the information and reupload the CSV file to match the previously unmatched attendees.
NOTE: Only the attendees that were not previously matched will be added to the roster, the system will not create a double attendance record.
To access the roster, click the Manage Roster This will allow you to double-check the attendance.

The PD Registry
registry@pakeys.org
1-800-284-6031